All 8 entries tagged Training
View all 85 entries tagged Training on Warwick Blogs | View entries tagged Training at Technorati | There are no images tagged Training on this blog
July 24, 2024
Testing the test suite
Testing is good! Or at least is can be. Tests increase our confidence that code is correct. However, writing bad tests is incredibly easy and assessing the quality of a test suite is a perfect example of the "crowbar inside the box" problem. If we can be sure we wrote the test correctly, why can't we make the same assertion about the code already?
Easy Cases
There are times when the tests truly are "easier", "simpler" or "more nailed down" and in these cases, we might feel safe.
For example, sometimes, the test is much simpler than the code, and sometimes the test really is externally prescribed, and in these cases, writing tests is pretty safe - we're unlikely to make the same errors in test and code.
Sometimes too, we can form extra, trivial-to-write, tests by not getting hung up on true "unit" testing and working with inverse pairs instead. For example we can verify our file writing and reading are the reverse of each other, and give us the correct object back. We can verify that our "plus" and "minus" are the reverse of each other, and that A + B - B == A. Making the test extremely simple means it has very little chance to be wrong, but it also limits how thoroughly we are testing things.
Code Coverage
You may have heard of coverage testing - adding confidence in your test suite by verifying that it actually "exercises" every line of your code. At least, that's what you hope. However, in general all coverage does is say that you ran a line - it can't say whether you verified the outcome.
But the Tests Passed!
To come to the important point: the tests are testing the code, and the code is testing the tests. If both agree, great. What if they don't? Are you really sure that the error is in the code, not the test? And on the flip side, if the tests pass, does that _really_ make you confident in the code?
Mutant Code
Enter "mutation testing" - a way to test our *test suite* using our *code*.
Mutation testing belongs near the end of development, once code is written, tests pass, coverage is good (all for a given function or set of functions, not necessarily the whole code), and you are wondering if there may still be bugs, or you are trying to get something ready for "prime time" and want to be confident it will work when used in ways you haven't been using it.
It's based on a very simple premise - if the code is broken, the test ought to fail. Sounds obvious, but have a good hard look at some tests you've written or worked with. Are you sure that will happen? Are there cases or paths that don't get checked? Are you catching all the edge cases and transition values in your test?
Once again, if just looking over the test code let you guarantee those things, then you could do the same to your code, and not need the tests at all.
Instead, let's break the code and see what happens. Swap operators, add off-by-one errors, remove checks on bad input! Force the tests to prove that they can fail! Then we know that passing means something.
Practical Mutation Testing
Obviously we want something systematic to do this, and that is actually pretty hard, and the topic of active Computer Science research still, in spite of having existed for ever already. But as always, "the perfect is the enemy of the good" or indeed the "good enough". The more holes we can close, the fewer will be left, so even something not great is worth a try.
The idea is as follows:
- generate systematic "mutations" of the source code
- check that these compile or run
- try and systematically eliminate "equivalents" - code that, although different, has the same effect
- run the test suite against every "mutant"
- If the tests fail, the mutant has been "killed"
- If the tests pass, there is a hole - an error they are missing
- try and fix the holes in the test suite
NOTE: there are a few things this can turn up that do indicate changes to the code are in order, but in general you should primarily be altering the test suite. If that causes tests to fail that you expected to pass, then you need to alter the code. If that shows sections of "dead" code, then you might want to alter the code. Try and keep these two processes separate.
NOTE 2: BE VERY VERY wary about altering your code just to allow it to be tested.
Tools
Recommending a tool is tricky. Github right now has ~300 repos tagged mutation-testing covering a bunch of languages. It also has several repos just listing extant and abandoned tools. The UniversalMutator (https://github.com/agroce/universalmutator) deserves a mention, as a language agnostic and pretty usable option.
If you're not sure if this is worth doing, try flipping a bunch of operators in your code, adding some range errors, deleting a statement etc and running your tests. See if you have gaps to fill.
Brief Aside:
Note for the interested: while that all might sound pretty convincing, there's a lot we are skipping over. For instance, we have to assume that big errors tend to occur due to multiple small errors, and thus squashing the small bugs will squash the big ones too. This is known as the "coupling effect" e.g. https://dl.acm.org/doi/10.1145/75309.75324which also discusses the wonderfully descriptive "Competent Programmer Hypothesis" which posits that we normally only make small mistakes in things.
Conclusions
Some times it is tempting to talk about testing as infallible. This has come up a lot recently with some high profile failures of large products, where many people despair that "they obviously didn't test it". That's just not true, we only know they didn't test for the specific failure.
Actually implementing "quality testing" is about a lot more than just adding a few test cases, and in important software, library software etc, it is good to be aware of just how much moreis needed to be truly confident in code quality.
If you take one point away from this, let it be this one: A test that cannot fail is no better than no test at all.
 Heather Ratcliffe
24 Jul 2024 14:36
|
Heather Ratcliffe
24 Jul 2024 14:36
| ![]() Tags: Bugs Code Programming Training
|
Tags: Bugs Code Programming Training
|  Comments (0)
|
Comments (0)
|  Report a problem
 Please wait - comments are loading
December 15, 2023
Gnu Parallel without root
A quick post for future reference: GNU parallel, the command line app to allow parallel running of multiple copies of a program etc, is designed to work just about anywhere. This means we can install it without needing any root access.
DISCLAIMER: This is intended for something like a managed laptop with Linux on. If you are working on shared systems, anything run through parallel would count as computationally intensive - please pay attention to where you are allowed to run such work! Also, check the package or module system for an existing parallel install! It's likely to exist already!
Here's the recipe:
# Do all this in our home directory. If you change to somewhere else, replace $HOME with that path where it occurs
cd $HOME
# Grab that latest source
wget https://ftp.gnu.org/gnu/parallel/parallel-latest.tar.bz2
# We could check the signature of this now, but since we'd grab the sig from where we grabbed the file, there is no point...
# Create an install directory called pllel - change this if you like
mkdir pllel
# Unpack and change to that folder
tar -xvf parallel-latest.tar.bz2
cd parallel-latest
# Configure to install into the directory we just created
./configure --prefix=$HOME/pllel
make
make install
# Now we add the location of the parallel program to our path
# Putting it first (before we repeat $PATH) means it will take priority over any other program called parallel
export PATH=$HOME/pllel/bin:$PATH
# Test everything
parallel echo ::: A B C D
Now, if you want this to be available in all your shells or sessions, you can add the export PATH line to your .bashrc, .bash_profile etc and then you don't have to do that every time.
Heather Ratcliffe
15 Dec 2023 12:28
| ![]() Tags: Parallel Training
| Comments (0)
| Report a problem
Tags: Parallel Training
| Comments (0)
| Report a problem
July 10, 2019
Datastructures – Linked lists part 3
Follow-up to Datastructures – Linked lists part 2 from Research Software Engineering at Warwick
This time we're presenting the final piece of the puzzle for linked lists - adding items. Adding items is very, very similar to removing them. To add an item "I" between two other items (lets call them "A" and "B", with A <-> B initially) you just have to set it up so that A's next pointer points to I, B's prev pointer also points to I and that I's prev pointer goes to A and I's next pointer goes to B. You do then have to take care if either A or B don't exist (i.e. you're adding at the start or the end of the list) but basically the idea is always the same. When you don't have a standard that you have to follow interface design in programming is often as much an art as a science and there are several ways of implementing a useful interface to do this. You can write a routine "insert_between(I,A,B)" that adds an item between two specified items (although this the has to deal with what should happen if you try to insert between two items that are not actually linked to each other and also requires the developer to provide redundant information. If this is going to work then A must be linked to B so if you know A you know B and vice versa). To add at the start of the list you specify "A" to be NULL, and to add at the end of the list you can specify "B" to be NULL. This isn't seen very often in the wild but it works perfectly well. You could also write "insert_after(I,A)" and "insert_before(I,B)" routines that would allow you to insert item I either "after A" or "before B", again specifying appropriate NULL items for A or B to add to the start or the end of the list. The most common approach in the wild at the moment is that used by the C++ Standard Type Library containers. Have a routine "insert(I,B)" that inserts the item before a specified item B, a routine "insert_after(I,A) to insert an item after the specified item, a routine "push_back(I)" that adds a new element to the end of your list and a "push_front(I)" routine to add the new item at the start of the list. While I'm not sure that I'd pick them from scratch I'll stick to the STL
void insert(llitem* head, llitem* new, llitem *before)
{
  new->next = before;
  if (before->prev) {
    before->prev->next = new;
    new->prev = before->prev;
  } else {
    head = new;
  }
  before->prev = new;
}

void insert_after(llitem* new, llitem *after)
{
  /*head is not used here because inserting after an item cannot touch the head*/
  new->prev = after;
  if (after->next) {
    after->next->prev = new;
    new->next = after->prev;
  }
  after->next = new;
}

void push_front(llitem* head, llitem* new)
{
  if (head){
    head->prev = new;
  }
  head = new;
}

void push_back(llitem* head, llitem* new)
{
  llitem * current = head;
  if (!current) {
    head = new;
  } else {
    /*spin on until you find an item that has no next element. That element is the end of the list*/
    while(current->next) current = current->next;
    current->next = new;
    new->prev = current;
  }
}
SUBROUTINE insert(head, new, before)
  TYPE(llitem), POINTER, INTENT(INOUT) :: head !Head of linked list
  TYPE(llitem), POINTER, INTENT(INOUT) :: new !Item to be inserted
  TYPE(llitem), POINTER, INTENT(INOUT) :: before !Item to insert before

  new%next => before
  IF (ASSOCIATED(before%prev)) THEN
    before%prev%next => new
    new%prev => before%prev
  ELSE
    head => new
  END IF
  before%prev => new
END SUBROUTINE insert

SUBROUTINE insert_after(new, after)
  !No head pointer because inserting after an item can't touch the head
  TYPE(llitem), POINTER, INTENT(INOUT) :: new !Item to be inserted
  TYPE(llitem), POINTER, INTENT(INOUT) :: after !Item to insert after

  new%prev => after
  IF (ASSOCIATED(after%next)) THEN
    after%next%prev => new
    new%next => after%next
  END IF
  after%next => new
END SUBROUTINE insert_after

SUBROUTINE push_front(head, new)
  !No head pointer because inserting after an item can't touch the head
  TYPE(llitem), POINTER, INTENT(INOUT) :: head !Head of the linked list
  TYPE(llitem), POINTER, INTENT(INOUT) :: new  !Item to be added to the list

  IF (ASSOCIATED(head)) THEN
    head%prev => new
  END IF
  head => new
END SUBROUTINE push_front

SUBROUTINE push_front(head, new)
  !No head pointer because inserting after an item can't touch the head
  TYPE(llitem), POINTER, INTENT(INOUT) :: head !Head of the linked list
  TYPE(llitem), POINTER, INTENT(INOUT) :: new  !Item to be added to the list
  TYPE(llitem), POINTER :: current

  current => head

  IF (.NOT. ASSOCIATED(current)) THEN
    head => new
  ELSE
    DO WHILE(ASSOCIATED(current%next))
      current=>current%next
    END DO
    current%next=>new
    new%prev => current
  END IF
END SUBROUTINE push_front
Once again a diagram will probably make things clearer.

There is one thing that you can spot easily from the implementations : in order to add to the end of the list you have to cycle through all of the intermediate items to get to the end. This isn't actually a major problem since for a lot of the uses of linked lists you can freely choose to add to the start of the list which happens immediately by just updating the head. However if you want to be able to add to the end of a linked list then it is common to actually store an equivalent of the "head" item that marks where the end of the list is. This item is generally called the "tail" item. I haven't described anything about using tails because it doesn't add anything to the fundamental nature of the linked list while making all of the implementation a little bit messier. Holding the tail also introduces a debugging risk because it is (technically) redundant and can be inconsistent with the actual last element that you would reach by iterating through the list (usually only because of errors in your implementation). The addition of multiple sources of information about something always complicates matters and you have to test very carefully to ensure that they can't become inconsistent.
This series has basically described how to implement a very simple linked list (if you wanted to). There are many limitations and weaknesses of this implementation (not being certain to nullify pointers on items when adding them, not having a tail item and also the fact that each item can only be in a single linked list at any point (usually you relax that requirement by having each llitem have a pointer to your real data rather than holding the data within the llitem structure itself. You do have to be careful to make sure that items are fully deleted when the last reference to them is released though!)) but it does, mostly, work. The final part of this series on linked lists is going to go through why you might not want to use them. Not just this limited implementation but when linked lists are not suitable datastructures and how you can create hybrids of linked lists and arrays that can perform much better.
Christopher Brady
10 Jul 2019 14:46
| ![]() Tags: Code Programming Training
| Comments (0)
| Report a problem
Tags: Code Programming Training
| Comments (0)
| Report a problem
June 12, 2019
Datastructures – Linked lists part 2
Follow-up to Datastructures – Linked lists part 1 from Research Software Engineering at Warwick
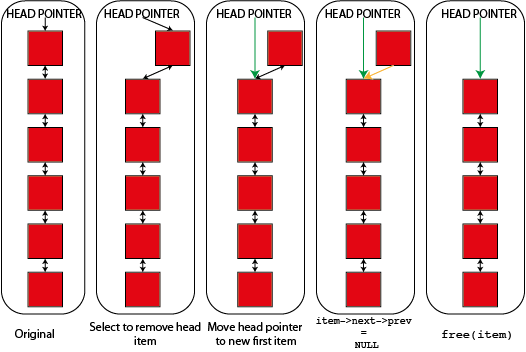
This entry is back to the subject of linked lists. In the previous post on linked lists we described the idea of a linked list and how you created one. In this post I'm going to talk about how you remove items. The idea is pretty simple, to remove item "n" you want item "n-1" to believe that the item after it is now item "n+1" and you want item "n+1" to believe that the item before it is item "n-1". There are a few wrinkles to deal with if the item is at the start of the list (recall that this is usually called the `head` element) but mostly the idea is this simple. This is most easily shown by a code example recalling the definition of linked list items from part 1.
void remove_item(llitem *item, llitem *head)
  {
    if (item->prev) {
    /*Item has an item before it in the list*/
    item->prev->next = item->next;
  } else {
    /*Item does not have an item before it. It is the head*/
    head = item->next;
    item->next->prev = NULL;
  }

  if(item->next) {
    item->next->prev = item->prev;
  }

  free(item);
}
SUBROUTINE remove_item(item, head)
  TYPE(llitem), POINTER, INTENT(INOUT) :: item !Item to be removed
  TYPE(llitem), POINTER, INTENT(INOUT) :: head !Head of linked list

  IF (ASSOCIATED(item%prev)) THEN
    !Item has an item before it in the list
    item%prev%next => item%next
  ELSE
    !Item does not have an item before it. It is the head
    head => item%next
    item%next%prev => NULL()
  END IF

  IF (ASSOCIATED(item%next)) THEN
    item%next%prev => item%prev
  END IF

  DEALLOCATE(item)

END SUBROUTINE remove_item
This routine removes an item from a linked list and deals with changing the head of the list to match if needed. After the item is removed from the list it is deallocated. You might not want to do this automatically when an item is removed from a list (you can have multiple lists and freely move items between them) but you do have to do it when you are finished with the item or you will have a memory leak. One of the downsides of linked lists is that since they involve direct pointer operations in normal use memory leaks are a greater risk than in many data structures.
You can also see what's going on in a diagram showing how you remove both a "normal" and a "head" item from the linked list. In both cases links shown in green are new links and links shown in orange are links that are being deleted or changed.
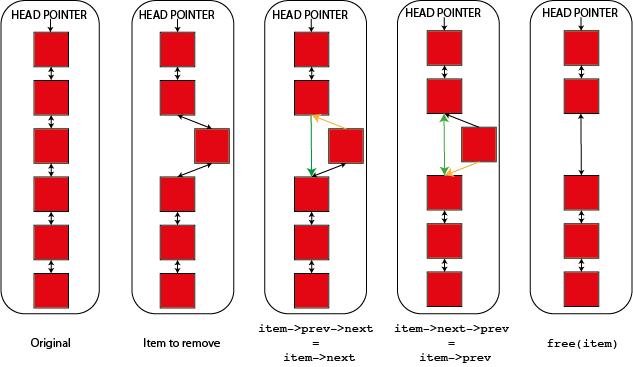
Hopefully the idea is quite clear between the code and the diagrams. If "item" is item "n" in the list then "n-1" is item->prev and "n+1" is item->next. Either or both of these items may not exist if "item" is either the start or the end of the list so you have to cope with these cases. So to update the next element of "n-1" you have to set "item->prev->next" which looks a bit odd but makes sense if you unpack it. Similarly the "prev" element of "n+1" is "item->next->prev".
You will notice that the links on the item being removed aren't touched and the code simply relies on that item being deleted immediately. In a system where you want to retain an item (perhaps to add it to another linked list) you'll probably want to nullify it's prev and next pointers after you remove it from the list.
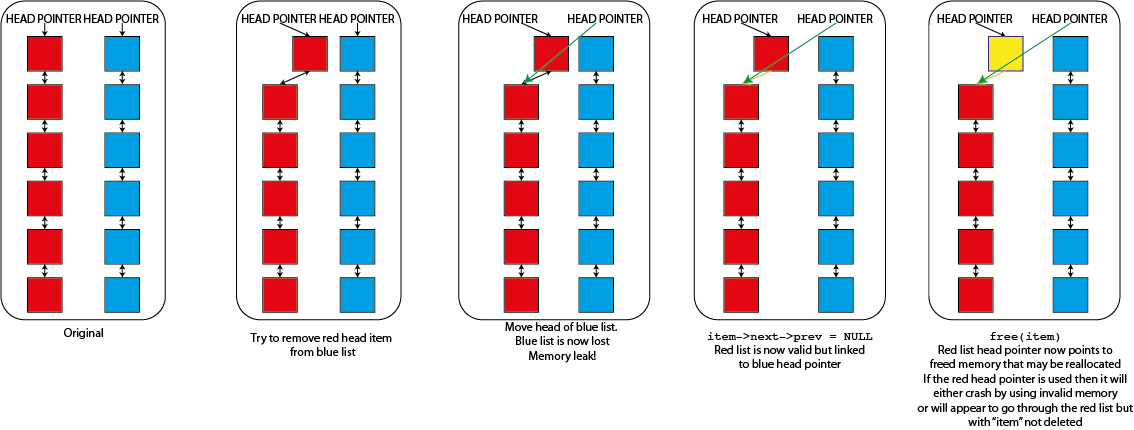
That code will remove any item from the linked list that it is in. There is however a problem if you have multiple lists, each with it's own head element. Imagine that I tried to use that "remove_item" function where I passed it an element from one list but the head from a different list. So long as "item" isn't the first item of the list that it is in then nothing would go wrong but as soon as it is it would replace the head of the second list. This would cause real problems
- The list that "item" was in will become invalid. Because it's "head" element is never updated it will still point to the now deleted "item" and will sooner or later fail when you try to use it. It might, for a while, look as though "item" hasn't been deleted because of this
- The original list that you specified the "head" from will now be lost completely. The only reference that you have to a linked list is the head element so if anything happens to this the memory is lost forever. You have both lost data and caused a memory leak
- You have also moved data. The list that you specified the head from will now be a valid list, but it will be the list that "item" was originally part of, not the list that is meant to be there.
This type of error in a linked list thus causes memory leaks, segmentation faults and data corruption all in one nice package so you have to be careful to avoid it. You can program in safeguards to prevent doing things like this but they do slow down the operation of the linked list and require extra memory (as well as making rather harder some nice tricks that you can do with linked lists that I'm not going to talk about here) so many working linked list implementations don't bother. You can see graphically what's happening here too.
Mostly linked lists in operation are stable and reliable but it is possible to get yourself into a bit of a tangle. But you can immediately see that this makes is a lot easier to remove an element from the middle of the linked list than if you had an array. If you had an array then you'd either have to flag that item as "invalid" somehow to know that you shouldn't use it anymore or failing that actually copy all of the elements in your array above the item being removed down to fill the gap. The first one adds complexity and means that you can't actually reduce your memory footprint when removing items (not quite true if you use an array of pointers to items but that's even more complicated) while the second is quite often very slow. This is especially true if you use a library that guarantees contiguity of the elements of your array after every delete operation when you are deleting multiple items (e.g. std::vector in C++. This behaviour is generally an advantage but here is a cost. You can get around it in other ways in C++ but other libraries are less flexible). The cost is managable if you delete many items and then pack the array up but packing after every deletion can be very costly.
The next entry in this section will describe adding items to a linked list which, as you might imagine, is quite similar to deletion but in reverse.
Christopher Brady
12 Jun 2019 16:31
| ![]() Tags: Code Programming Training
| Comments (0)
|
Tags: Code Programming Training
| Comments (0)
|  Trackbacks (1)
| Report a problem
Trackbacks (1)
| Report a problem
February 27, 2019
Data structures – Stacks
Another fairly simple data structure this week - the stack. The stack is basically the reverse queue. Rather than the first item to arrive being the first to be served as with a queue in a stack the last item to arrive is the first to be served. The name comes from the idea of a stack of paper where you add pages at the top and then take them off the top again when you want them. Formally this behaviour is called LIFO (Last In First Out) as opposed to the FIFO (First In First Out) queue.
As you might imagine this is quite a restrictive data structure and the classical stack actually only has two operations
- push - add an element to the top of the stack
- pop - take the top element off the stack and give it to you
You'll notice that pop and push are inverses since pop removes the top element from the stack and gives it back to you. This isn't always what you want since you might find that you have to simply push the element back onto the stack if you can't deal with it yet. To make this easier a lot of stack implementations also have a snoop operation which tells you what is on the top of the stack without actually taking it off. What you never have in a true stack is a way of accessing an arbitrary element in the stack. If you can do that then you have an array that you are accessing in a "stack-like" way. This is also something that people quite often want to do, so you find that lists in Python have a "pop" method to remove the rightmost element (although the equivalent of "push" is called "append" for a Python list, probably because it is used for a lot more than making stacks).
Implementations of stacks are generally very simple. The simplest implementation is just an array with an index to the first free element in the stack. When an element is pushed it is added at that location and the index is moved on by one element. When a pop happens the element behind the index is given to the user and the index is moved back by one.

This will all work perfectly well until you run out of space in your array when, much as with the queue, you have to do something else. You can reallocate your stack to give yourself more space, copying the existing elements as you go, you can implement a stack using a linked list (which we will cover in a later post) which means that you won't run out of stack until you run out of memory or you can refuse to accept the new item an return an error. If you do nothing and accept the new item you access memory that you are not supposed to be using at all which can cause all kinds of problems from crashes to possible security exploits and this is called a buffer overrun, which might be familiar with as one of the most common things that are listed as the cause of security problems in software.
At this point it is worth drawing a distinction between the stack as a data structure and all of the other things that are called stacks. There are call stacks that were mentioned in the last blog post which described how a program got to be in the place where it is and there is an associated CPU feature called a "stack register" that holds this information. There is "stack memory" which together with "heap memory" make up the most common way of dealing with memory management in compiled codes and there are plenty of other stacks that turn up all over the place. In general they get the name because they implement a stack data structure (sometimes they used to be a stack back when the name was given to them but no longer do) and otherwise are not really related. You have to be rather careful because lots of things are called stacks and that name itself doesn't alway tell you very much. Always read the documentation!
A question that might come to mind is "what would I ever do with a stack?" They do seem rather less use than a queue and in practice they are mostly fairly "low-level" data structures that most people don't encounter much, but you can easily enough think of cases where they are useful. Their most useful feature is as a "memory" of a sequence of events that can then be undone. Many "undo" systems in software use stacks behind the scenes for exactly this reason. For the same reason they are often used in "depth-first search" algorithms which were first investigated (and still used!) as ways of solving mazes. They also crop up in algorithms to parse mathematical and programming languages (a good example being the Shunting Yard Algorithm, named after train shunting yards. You can easily see the similarity between a stack as described here and a train siding because you can only get carriages off a siding in the reverse of the order you put them in on). But in general you probably won't need to implement your own stacks very often but it is worth knowing about them because they are so ubiquitous in the lower layers underpinning all of modern software development.
Christopher Brady
27 Feb 2019 18:00
| ![]() Tags: Programming Training
| Comments (0)
| Report a problem
Tags: Programming Training
| Comments (0)
| Report a problem
February 07, 2019
New Training
New RSE training opportunity - intermediate level MPI. Following on from a basic MPI course, such as our Intro (Dec. 2018) or Warwick's PX425, we have a 1-day workshop on some trickier topics, such as MPI types. See here for details.
Heather Ratcliffe
07 Feb 2019 12:33
| ![]() Tags: Hpc Mpi Training
| Comments (0)
| Report a problem
Tags: Hpc Mpi Training
| Comments (0)
| Report a problem
October 02, 2018
Upcoming Training Opportunities
Warwick RSE's autummn term training is now available for signup for any University of Warwick Staff or students, and anybody from the HPC-Midlands-Plus consortium.
This time we have two options.
The first is aimed mainly at Warwick Researchers who wish to use HPC facilities. We'll go through getting access and some essential info you'll want to know, as well as briefly mention where else you can get computing resources.
Secondly, we have a short 3-hour seminar going over all the bits of Software Development researchers should know about. This will be a pretty rapid spin through a lot of tools and words you'll need to know. Hopefully, you'll then spot when you should go and learn more about these things as they come up in your research etc.
For dates, signup etc, see our calendar
Heather Ratcliffe
02 Oct 2018 17:41
| ![]() Tags: Hpc Programming Training
| Comments (0)
| Report a problem
Tags: Hpc Programming Training
| Comments (0)
| Report a problem
February 01, 2018
Upcoming training opportunity
February 26-27, University of Leicester. Software Carpentry. A 2-day rapid introduction to basic programming and tools, primarily focussed on programming in Python.
Heather Ratcliffe
01 Feb 2018 14:06
| ![]() Tags: External Programming Training
| Comments (0)
| Report a problem
Tags: External Programming Training
| Comments (0)
| Report a problem
 Loading…

