All 4 entries tagged Rich Internet Applications
No other Warwick Blogs use the tag Rich Internet Applications on entries | View entries tagged Rich Internet Applications at Technorati | There are no images tagged Rich Internet Applications on this blog
March 08, 2009
More AIR web automation – styles and dispatching mouse events
Follow-up to Automating web workflow in Adobe AIR from Transversality - Robert O'Toole
More experiments with creating automated workflows using the AIR html component. The following code gets the dom document once the html has loaded. It then gets a reference to a span in the document called 'edittool'. Once an element is referenced as a Flex Object, we can call native javascript methods on it. In this case, I give it a yellow dashed border. I then get hold of the A element that is it's child, and dispatch a mouse over event to it, causing its mouseover handler to be called. The result is that the edit menu appears.
private function initDomWindow(event:Event):void {
    this.domWindow = event.currentTarget.domWindow;
    var edittool:Object = domWindow.document.getElementById("edittool");
    edittool.style.borderColor = "yellow";
    edittool.style.borderStyle = "dashed";
    var overevent:Object = domWindow.document.createEvent("MouseEvents")
    overevent.initEvent("mouseover", true, true);
    var a:Object = edittool.getElementsByTagName('A')[0];
    a.dispatchEvent(overevent);
}

The html mxml tag is configured as:

<mx:HTML id="htmlTranslate" width="800" height="800" location="{this.url}" complete="initDomWindow(event)"/>
March 06, 2009
Automating web workflow in Adobe AIR
This entry was created using an AIR based browser.
Yes, it's possible. I wrote a simple AIR app that signs me in to Warwick Blogs by loading the login page into an AIR app, populating the login form fields, and submitting. It's also possible to call javascript methods in the page. Here's the code:
<mx:WindowedApplication xmlns:mx="http://www.adobe.com/2006/mxml" layout="absolute" width="1024" height="768">
<mx:Script>
<![CDATA[
import mx.controls.Alert;
private var domWindow:Object;
private var blnAlertThrown:Boolean = false;
private var load:int = 0;
private function initDomWindow(event:Event):void {
if(load == 0)
{
load++;
domWindow = event.currentTarget.domWindow;
getElementFromHTML("userName").value = "myusername";
getElementFromHTML("password").value = "mypassword";
domWindow.document.forms[0].submit();
}
else
{
load++;
}
}
private function getElementFromHTML(elementName:String):Object {
var arrayContainingAllFoundElements:Object = domWindow.document.getElementsByName(elementName);
return arrayContainingAllFoundElements[0];
}
]]>
</mx:Script>
<mx:HTML id="htmlTranslate" x="10" y="84" location="http://blogs.warwick.ac.uk/blogbuilder/admin/create/plainEntry.spr?blog=094d4021fb4dbd6d00fb4de01b490001&newPermissions=Anyone&newCommentPermissions=Anyone" complete="initDomWindow(event)"/>
</mx:WindowedApplication>
March 25, 2008
Flex 3.0 + Spring JDBC + BlazeDS = awesome
Follow-up to Using BlazeDS to invoke server side Java classes from client side Flex Flash applications from Transversality - Robert O'Toole
I am investigating the possibility of moving the query layer of a web application off the SQL Server that hosts the data (so as to allow me to more easily move the database to another platform). Last week I mastered BlazeDS for Java remoting. That was easy. So I decided to add Spring to the mix, following this excellent article from Adobe Labs. I’ve never used Spring before, but understand how it simplifies such applications.
It didn’t take long to understand the example from Adobe, and adapt it to query the SQLServer database that I have used.
And when I pressed the ‘query’ button on my Flex app, I was astonished. 10,000 rows appeared immediately as an ArrayCollection. Whereas my Flex/JSON/Java app would request 100 rows at a time, with a new query each time the datagrid page was changed, I can now load every single record and immediately work with it in the browser.
Next trick? Hibernate.March 20, 2008
Using BlazeDS to invoke server side Java classes from client side Flex Flash applications
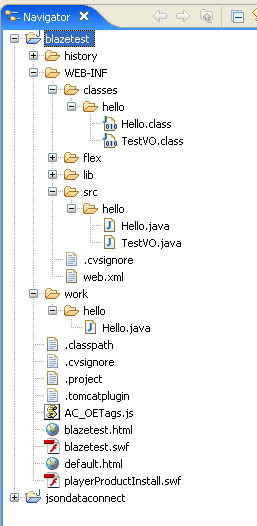
A BlazeDS project is simply a standard web application, with a few additional features. In this case I have created a Tomcat application in Eclipse. You can see the various components in this image of the Eclipse resource navigator:

The additional elements within the web app are:
- The flex directory in WEB-INF, containing the BlazeDS configuration files for this application, with the required service configurations (for example, making Java classes available to Flash).
- Various jar library files in the lib directory.
- The flash application (swf and html files) generated from the Flex 3.0 project.
- Some configuration settings added to the web.xml file.
To get it all set up, I followed these steps:
1. Create the Tomcat project in Eclipse.
2. Add the jar files.
3. Add the flex directory with template config files.
4. Modify the web.xml file so that BlazeDS requests are handled.
We need to add the listener...
<listener>
<listener-class>flex.messaging.HttpFlexSession</listener-class>
</listener>
And a message broker servlet...
<servlet>
<servlet-name>MessageBrokerServlet</servlet-name>
<display-name>MessageBrokerServlet</display-name>
<servlet-class>flex.messaging.MessageBrokerServlet</servlet-class>
<init-param>
<param-name>services.configuration.file</param-name>
<param-value>/WEB-INF/flex/services-config.xml</param-value>
</init-param>
<load-on-startup>1</load-on-startup>
</servlet>
<servlet-mapping>
<servlet-name>MessageBrokerServlet</servlet-name>
<url-pattern>/messagebroker/*</url-pattern>
</servlet-mapping>
<welcome-file-list>
<welcome-file>default.html</welcome-file>
<welcome-file>default.htm</welcome-file>
</welcome-file-list>
5. Create a new Flex 3.0 project.
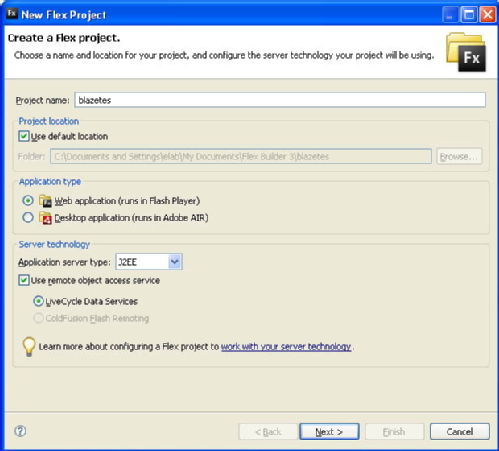
Use settings like this:

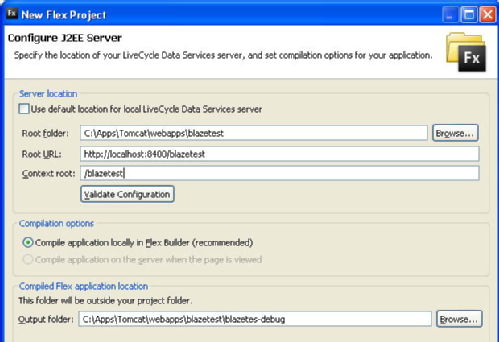
Note that I have set it to use LiveCycle Data Services (now known as BlazeDS) and a J2EE application server. In the next screen, the location and url of the web app must be specified. Note how I have set the output folder of the Flex application to be the root of the web application, so that when I run the Flex app it is built and deployed directly into the web app.

6. Write and build a class in the Eclipse web app project.
I created a class called Hello in the package hello. To start with it contains two simple methods. One method is called sayHello, and returns a string. The other method is multiiply(int i, int j). This method returns the value of i * j.
7. Make that class and its methods available to the Flex application via BlazeDS.
The following 'destination' needs to be set up in the remoting-config.xml:
<destination id="Hello">
<properties>
<source>hello.Hello</source>
</properties>
</destination>
The source maps to the Hello class in the hello package.
I also pared-down the services-config.xml file so that only the remoting service is being used (as suggested by Ashier):
<services>
<service-include file-path="remoting-config.xml" />
</services>
8. Add a RemoteObject to my MXML application file in Flex 3.0.
This points to the class that I have created and registered with BlazeDS. See how the source points to the Hello class in the hello package. Also see how the RemoteObject has its own id. We use that to referece it and call its methods.
<mx:RemoteObject id="blazeService" fault="faultHandler(event)" source="hello.Hello" destination="Hello">
<mx:method name="sayHello" result="resultHandler(event)" />
<mx:method name="multiply" result="resultHandler(event)" />
</mx:RemoteObject>
Notice how I have registered the two methods, and specified a resultHandler method (in this case the same handler, as it just displays the string that is returned in a text box).
9. Call one of the methods, and handle the result.
I have a button that, when pressed, calls a method that calls the multiply method on the RemoteObject...
blazeService.multiply(i, j);
This method executes asynchronously on the server, in the class Hello. The values of i and j are passed to the Java method. The result is receieved bythe specified result handler method in the action script:
private function resultHandler(evt:ResultEvent):void {
result_text.text = evt.message.body.toString();
}
In this case, I simply get the single string that is returned, and display it in a text box.
Alternatively, I could get a series of arguments, an ArrayCollection, an Object. I can also create a value object class in the Flex app, mirroring a class in the Java. This class may then be passed back and forth in the method call (i'll document this in another article).
 Robert O'Toole

 Please wait - comments are loading