All 7 entries tagged Learning Spaces
No other Warwick Blogs use the tag Learning Spaces on entries | View entries tagged Learning Spaces at Technorati | There are no images tagged Learning Spaces on this blog
October 26, 2009
IDCM MA Multimedia Communications 3 – CAPITAL Studio + iMacs
Follow-up to IDCM MA Multimedia Communications 2 – more Design Thinking, Open(ish) Space Learning & Teaching Grid from Inspires Learning - Robert O'Toole
A brief report on the third session in my Multimedia Communications series for the International Design and Communications MA (in the CAPITAL Studio), with some initial thoughts on two contrasting "user configurable" "open" learning spaces provided by the Teaching Grid and the CAPITAL Centre.
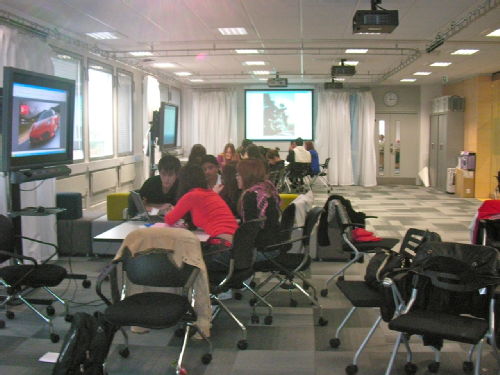
In the previous two sessions we had used the Experimental Teaching Space in the Teaching Grid at Warwick's Library. Here is a photo of us working in that space:

As you can see, we made use of its user-configurable characteristics (movable chairs, tables, "shower curtain" and glass partitions, wifi) as well as plenty of technology (many roof mounted projectors, Smartboards, laptops, cameras etc). I suspect that, despite it's user-configurability, students will always experience it as an office-like space. Some have also said that it doesn't quite feel private enough for them to relax and feel as if they can take creative risks.
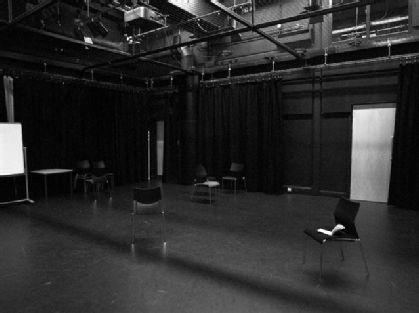
For the third session, we used the performance studio belonging to the Creativity and Performance in Teaching and Learning (CAPITAL) Centre - a very different kind of space. Here's a photo:

It's a "black box" studio space, familiar to theatre students and performers. It is described on the CAPITAL web site as:
the CAPITAL Centre's biggest space. As well as hosting workshops and classes, the Studio is also used for performances, masterclasses, training events and visiting practitioners.
And:
a black box studio with semi-sprung harlequin floor. An overhead wired grid provides access to the lighting bars from a technical room on the first floor. There is also the facility to build a section of raked seating in the room. 1
The room was arranged as follows:
- Semi-lit, with a white projector screen at one end;
- A Mobigo portable stand with projector and laptop (MacBook AIR with wifi) in front of the screen;
- A semi-circle of 16 chairs around the Mobigo;
- Three tables, each in a corner, each with a 24" iMac (with wifi).
Due to timetabling limitations, at the start of the session I had to get three students to help me to move the iMacs into the room and set them up. Interestingly, as we did this, the students made themselves at home and started to behave in a playful manner (in fact they found the piano!).
A Description of the Session
I had intended that the session would include three iterations of building prototype designs, collectively testing, and reflecting. However, the testing and reflection elements worked well, and we could only go through two iterations.
I began with the students sitting on chairs in a semi-circle around the projector. The aim of this first part of the 2 hours was to reinforce the "design thinking" approach, with reminders about the design task (building a personal e-portfolio), and the theory of design thinking (iterations, prototyping, 3 spaces). I also wanted to ensure that the students understand that the approach applies equally to processes design, service design, communication design, academic work and the development of more physical products. I wanted to emphasise the importance of the "experience architect" role in this, treating all of these design tasks as being "experience design" processes. To make this clear, I played a video of David Kelley (of the IDEO design company) talk at Stanford about "designing experiences"2.
Kelley is a convincing speaker. I was then able to use a second video of Kelley, in which he talks about his work on prototyping the original computer mouse for Apple. I emphasised the importance in this of understanding the whole user experience3.
However, when compared to the latest Apple mouse (just released), it's clearly a very limited experience! I had hoped to show a video of the new mouse, to illustrate what results a deeper and more wide ranging "experience architecture" can give, but I couldn't get the movie to play over wifi (the only failure of the session).
After these introductory considerations, we moved into the iterative series of activities. I asked the "experience architects" (self-nominated in the first week) from the three teams to form a separate group. Then I gave the remaining team members a task:
In just five minutes, create an engaging, exciting design for an e-portfolio representing a fictional or real IDCM MA student - using words and images.
At the same time, the "experience architects" were to collectively discuss the question:
What kind of experience would satisfy the main audience for the e-portfolio (and who are they)?
The three groups organised themselves around the three iMacs, but in a much more informal and mobile way than they would have done in the Teaching Grid. Many of them ignored the chairs, remaining standing or kneeling down. They seemed to respond well to the task and its five minute limit, being more active than they were when faced with a similar task in the Teaching Grid.
When it came to the time to present their prototype ideas/designs, each group decided quickly upon a mode of presentation. I noticed that they seemed more prepared to take risks and be creative (of course that could have been the result of being three weeks into term, but the step was noticeably large). The panel of "experience architects" got the presenters to focus on them for the presentations, with a definite sense that they were in charge of that part of the session (whereas in the Teaching Grid it always felt as if I were in charge). The feedback was excellent, well thought out and I think most useful. We also reflected on the process a little, with the students responding well to the rapid thinking/creating, prototyping and testing approach.
This first iteration was followed by a second longer iteration of the same task, in which the students developed their ideas further into screen based prototypes.
A Space to Encourage Iterative Creative Risk Taking?
The CAPITAL Studio contrasts dramatically with the Teaching Grid. It is larger, darker, and more private. Perhaps more encouraging of imaginative activities (less like an oppressive office space more like a blank "hollodeck" for active imaginations). It's sense of openness, and it's sprung floor seem to encourage movement. However, I can still configure it to give functionality similar to that in the Teaching Grid. The iMac screens are good enough to replace projector screens for a group of this size (16). Wifi was reliable. And the Mobigo projector and screen worked effectively, with good sound quality. It proved to be a little too dark for my Sanyo Xacti camera when taking wide shots (hence I have no good photos of the session) - I will have to find out about how to control the lighting set up. This is all good for my particular requirements, as:
- I need to encourage the students to search for inspiration amongst each other, and also online;
- The students need to be able to collectively construct "prototype" concepts, theories, explanations, narratives and designs, in some cases using the iMacs (concept maps, Powerpoint, or whatever tools they feel are useful) and in other cases away from the iMacs (so that they construct them fast).
- They need to be able to quickly test their prototypes out on each other, using presentation and performance startegies that may or may not draw upon technology - feeling able to take risks;
- They should be able to give critical feedback to each other openly and in a sensitive manner;
- These processes need to be undertaken iteratively, sometimes quickly, sometimes slowly, but with the teacher guiding the process and drawing them back together to share ideas and reflections.
For the students to successfully address the "design challenge" set as the ultimate goal of this series of workshops, they must become good at the "design thinking" approach as described by Tim Brown:
- Get "inspired" through an active discovery process;
- Through "ideation" (theory building), rapidly create "prototypes", and test them in meaningful contexts (with real people);
- After iterating through "inspiration" and "ideation", move confidently towards "implementation", creating a "shippable" product.
In the Teaching Grid based sessions, we explored this process and tried out some team based "inspiration" and "ideation" approaches. I'm trying to discover how the two spaces (Teaching Grid and CAPITAL Studio) might encourage this kind of behaviour.
I will now follow this up with questionnaires and interviews, so as to discover more about the process and the impact of different learning spaces.
If you are interested in using the CAPITAL Centre's innovative teaching spaces, see http://go.warwick.ac.uk/capital
______________________________
1CAPITAL Centre web site, http://www2.warwick.ac.uk/fac/cross_fac/capital/roomsandbookings/studio/ [Accessed 26th October 2009]
2Kelley, David, Designing Products vs Designing Experiences, eCorner: Stanford University's Entrepreneurship Corner, March 2001, http://ecorner.stanford.edu/authorMaterialInfo.html?mid=685 [Accessed 26th October 2009]
3Kelley, David, Prototyping the Mouse, eCorner: Stanford University's Entrepreneurship Corner, March 2001, http://ecorner.stanford.edu/authorMaterialInfo.html?mid=687 [Accessed 26th October 2009]
October 19, 2009
IDCM MA Multimedia Communications 2 – more Design Thinking, Open(ish) Space Learning & Teaching Grid
Follow-up to A tentative move towards technology enhanced Open Space Learning in the Teaching Grid from Inspires Learning - Robert O'Toole
A brief report on the second of my Multimedia Communications workshops for the International Design and Communication Managament MA.
We began with the 15 students (1 off ill) gathering at one end of the Experimental Teaching Space, for an informal talk about the previous week's session, and the "design challenge" to be completed in 9 weeks:
- Each student is to create their own personal online e-portfolio, using the rich features of the Warwick web publishing and content management tool (Sitebuilder) - many of these features were demonstrated using the Virtual R&D Space set up in the course web site.
- The e-portfolio needs to communicate, promote, explain each student's unique and individual value to potential employers, partners and clients.
I then reiterated messages about the "design thinking" approach of Tim Brown and Tom Kelley (IDEO), explaining how "inspiration" activities and "ideation" activities can build to successful and valuable "implementation" through an iterative process. I said that during the workshop we would go through two such iterations, building a message (in small teams) about each of the students.
Design Thinking
I then played the section of Tim Brown's Innovation Through Design Thinking lecture (from iTunesU, recorded at MIT) introducing the three "spaces" (inspiration, ideation and innovation), linking this to the Virtual R&D Space. This was followed by the section dealing with "Inspiration" - which is very inspirational! I used this video again later in the session, and will return to it later in the series of workshops (an effective way of using a video by an expert to glue together a set of varied activities).
Forming Teams for a Design Task Using the Ten Faces of Innovation
The next phase of the workshop involved working in small design teams. The task for each team was to create a simple narrative presenting the members of the team, specifically stating:
- Five great things about each person.
- One thing that inspires each person.
I drew upon Kelley's Ten Faces of Innovation to guide the creation of the teams (inititally I had aimed for 4 teams, but the student preferred 3 teams of 5). In the previous week's session, each of the students had chosen one of the "Ten Faces" with which they most closely identify. This gave us 3 "directors". I asked the "directors" to lead the groups, and to choose 4 other students. The other students held up a print out representing their chosen "face". The smart solution, for the directors, would have been to choose the blend of the 10 faces that they thought would create a good team. The students seemed a little reluctant - not used to such approaches (but I persisted, as smart team-formation is a key skill in the subject domain). I got them up on their feet and moving around, which seemed to free-up their attitudes a little. The teams that formed did seem to be mixed and well thought out (even though they had very little time in which to choose). When I do this exercise again, I will think of a better approach to this "speed dating" objective.

Teams working in the Teaching Grid Experimental Teaching Space
First Iteration
Once that the students were in teams, they moved to three areas set out by the Teaching Grid Advisors. Each area had tables, chairs, a laptop and a screen (Smartboard or projector). We spent about 30 minutes on this task. I refrained from getting too involved, only occasionally reminding the students of the task, and of the suggested approaches: how each of the "10 faces" might work to encourage discourse and creativity (especially the "experimenters" and "cross-pollinators". After a while I introduced some ideas about how an "anthropologist" type might try to get participants to talk more freely. Although progress was a little slow (I sensed a little awkwardness), I think that ideas about the "investigative" "discovery" process required for design inspiration started to become clearer. After 20 minutes the students had started to create "prototype" narratives to test out with each other, however, I realised that the importance of the "prototype-test-prototype-test..." process needed to be emphasised more strongly.
More Design Thinking
The second iteration of the process was intended to move towards having a more formally documented "story", resulting in a team presentation performance that would demonstrate the value of the process and a software tool that supports it.
Before we moved into this, I played another section of the Innovation Through Design Thinking lecture, focussing upon "ideation" - I emphasised Brown's statements about "ideation" being "building to think", meaning the creation of testable prototypes (physical, and in the form of stories, short films etc). The flexible nature of the Teaching Grid Experimental Teaching Space, helped us to move easily between focus on a single screen and team work. Using a video lecture in this way worked brilliantly, and made me consider how lecture videos could be useful in seminars for all subjects.
I then demonstrated a software application that I find to be invaluable at this stage of the design process: Mindjet Mindmanager (an intuitive and powerful mind/concept mapping tool). I demonstrated how I use this in real design work with clients to rapidly map out a domain, and to create prototype stories and arguments that can be presented and tested (I used a map that I recently used on a design task for an online learning project). I demonstrated the basics of how to create and (re)organise a map, and then set the student teams off with the task of turning information gathered in the first phase into concept maps (illustrated with links and images), and then a prototype presentation based on their maps.
Second Iteration
At this point progress accelerated dramatically. It became clear that having a physical product as the object of the team's efforts gave them the structure and direction that they lacked in the previous exercise. The distinct "10 faces" roles also seemed to become more apparent. These effects might have happened without the use of the software, however, in my experience, it's intuitive and expressive power does have a transformative effect upon groups. Being able to think together in such a visual and easily editable format helps people to be more exploratory and imaginative. It should also be said that the students seemed to really enjoy using Mindmanager, as can be seen in the maps and presentations that they created.
That Mindmanager encourages collective design thinking is apparent in this example:
I was particularly impressed with the selection of a theme that runs across each member of the team as documented on the map. We only had a short time at the end of the session, so I asked this group to present. The result was excellent. They had, in a very short time, created an engaging presentation, improvised by having the map on the screen in front of them. I recommend this approach as a means for quickly creating a team presentation on any topic. The technique of using visual metaphors (in this case a range of different cars), gave additional cues that eased their way through the information as they presented (and probably also as they discovered the information).
We applauded the presentation, and a few of the other students commented on aspects that they liked. I suggested that creating a set of e-portfolio pages all based on a theme might be an idea to investigate.
The session worked very well, and the students ended with an appreciable "buzz".
Design thinking, getting students on their feets and active, Mindmanager - all proven to work well!
October 11, 2009
A tentative move towards technology enhanced Open Space Learning in the Teaching Grid
On Thursday 8th October, I led the opening session for my Multimedia Communications workshops, as part of the MA in International Design and Communication Management (Centre for Cultural Policy Studies).
This is my fifth year teaching these sessions. They have evolved significantly over that time, as I have introduced increasingly sophisticated techniques, software and hardware. Last year I based two sessions in the Teaching Grid's experimental teaching space. This year, I will do two sessions in the Teaching Grid, two sessions in the CAPITAL Centre's studio, four sessions in a traditional IT training suite, and one drop-in session in the CAPITAL Centre's media suite.
The first two sessions aim to rapidly introduce the students to:
- the "design thinking" approaches necessary for successful web design when faced with an unfamiliar and difficult-to-define target audience (iteration, empathic design, prototyping, and the 3 space approach inspiration-ideation-implementation);
- the technologies on offer that can be used to aid the design process, and to rapidly build and test the finished product.
The design task, and the context within which it is undertaken, present the students with many challenges and constraints that can only be met effectively through fast learning, innovation and experimentation, use of physical and virtual space, and team work.
The initial Teaching Grid session was designed to be both challenging and enjoyable, inspiring and ideational. I began slowly (as students found their ways to the room), with introductions and an overview of the task. Initially, we sat around a projector at one end of the room. I demonstrated the course web site and it's Virtual R&D Space. I presented some key slides with quotes and ideas from Tim Brown's Design Thinking article. These had been uploaded as images to a Sitebuilder gallery in the course's V R&D Space. Up to this point the session was largely conventional in format.
I then outlined the task that would fill the rest of the session. I wanted the each student to create a short description about themselves, and post it onto the news section of the Virtual R&D Space. I didn't specify whether this had to be done in groups or individually. Before starting the activity, I introduced a further concept, and a further task.
In his book Ten Faces of Innovation, Tom Kelley of IDEO argues that a successful design and innovation team should consist of a good blend of certain "personas" (e.g. the anthropologist, the experimenter, the cross-polinator). I had created a presentation of the ten faces, as a series of slides in a gallery in the V R&D Space. Each slide had the title of the persona along with a representational image. I presented these with a short explanation. The students were asked to reflect upon the personas during the practical activity, considering how they were working together, and to choose a persona most suited to themselves. I handed out copies of the slides representing each persona, as extra inspiration and as a focus for discussion.
I then let the loose! We had a large wi-fi enabled, user-configurable, space full of technologies: 2 iMacs (with built in cameras), 2 MacBooks, 6 Windows laptops, 2 Smart boards, numerous projectors, whiteboards, and four Sanyo Xacti HD cameras. The students gravitated towards groups. With an open layout, these tended not to be quite so rigidly maintained as is often the case with international students. The students quickly adopted various items of equipment. Two groups clustered around iMacs. Others adopted a laptop each. Several students used the cameras. One pair created an interesting photo of themselves with a whiteboard drawing in the background (a light bulb over one girl's head, and a pair of cartoon eyes-on-stalks for the other). I demonstrated how to use the Apple app PhotoBooth to take photos, modify them with special effects, and upload to a gallery in the V R&D Space. As news messages and images were posted, they appeared on the big screen at one end of the room. I was able to comment verbally on them as they appeared.
This was all met with great excitement and enthusiasm! The open space environment proved to be a great way to get lots of simultaneous experimental activity, while maintaining a cohesion in the group. I had planned for a two hour session. The students had actually been told that it would be three hours long, and didn't seem to mind carrying on.
Finally, I drew the session to a conclusion by getting the students to stand in a wide arc, with each student holding the slide representing their chosen persona. I then filmed as each student (happily) said their name and their chosen persona. The range of chosen personas became clear to everyone. I think that the process of choosing a persona, while undertaking a collaborative activity, will have got them to reflect upon the implications of their choice and how they might work within a design team.
Using a more open and mobile configuration within the Teaching Grid had a positive effect upon the session. For the next session, I will work more on separating "inspiration" and "ideation" spaces and activities.
A further discovery is that Photo Booth is a very useful application in such situations. I am now thinking about how this can be used within the Open Space Learning project. For example, we might have MacBooks on movable height adjustable laptop stands. The students can move a laptop into position, take a photo or video of an activity, review the image, and then upload it. In combination with a simple uploading tool, allowing the addition of keywords and descriptions, this could be very effective.
 Robert O'Toole

 Please wait - comments are loading


