All 37 entries tagged Ideation
Well ordered conceptualisations forming prototype arguments and solutions to be tested against real world situations.
View all 55 entries tagged Ideation on Warwick Blogs | View entries tagged Ideation at Technorati | There are no images tagged Ideation on this blog
February 27, 2011
What shape is my research?
Innovation-oriented research...
It starts off quite wide, as I look for "inspiration" (challenges, norms, positive deviance, patterns, cross-pollinations etc). It then narrows down through ideation to hypothesese, methods, prototypes. It widens out again with lots of prototyping and experimentation, before narrowing that back down into design patterns and case studies that might apply more widely. Finally there is implementation as a thesis, a handbook and innovations with impact (widening back out again).
Here's an abstract model (click to enlarge):

And that model with some of my specific activities added:

 Robert O'Toole
27 Feb 2011 11:29
|
Robert O'Toole
27 Feb 2011 11:29
| ![]() Tags: Ideation
|
Tags: Ideation
|  Comments (0)
|
Comments (0)
|  Report a problem
 Please wait - comments are loading
February 19, 2011
Successful design thinking workshop prototyping a new distance learning course
Follow-up to Design thinking workshop to prototype a new distance learning course from Inspires Learning - Robert O'Toole
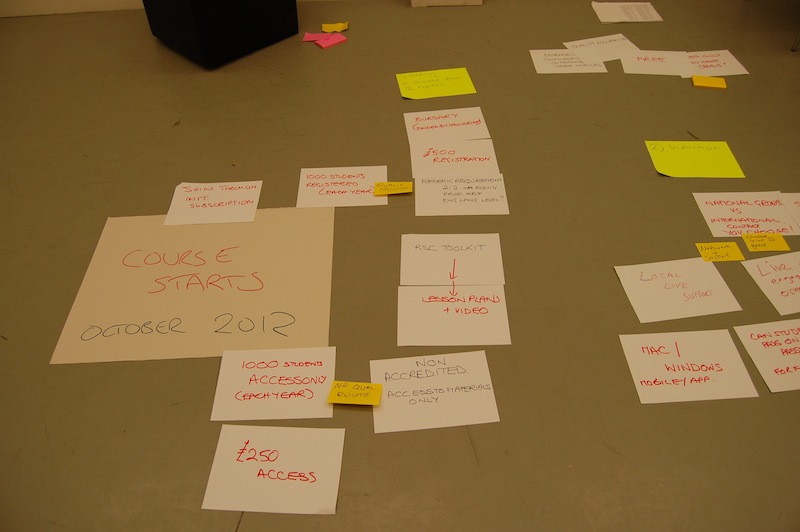
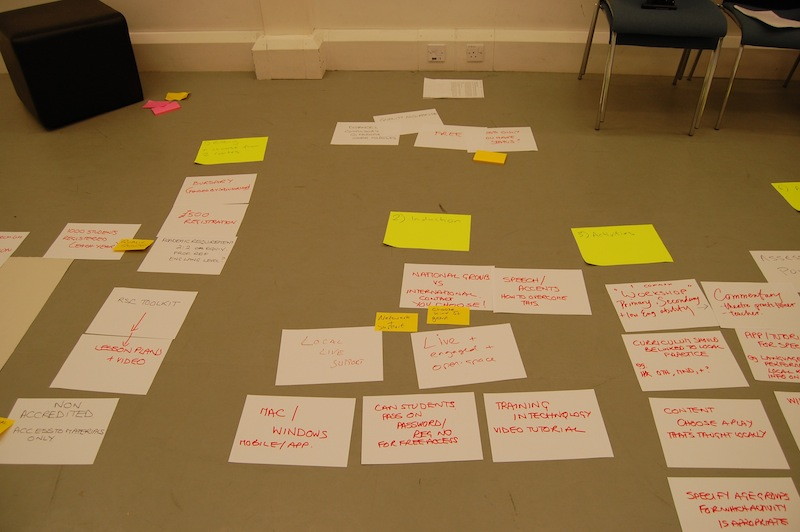
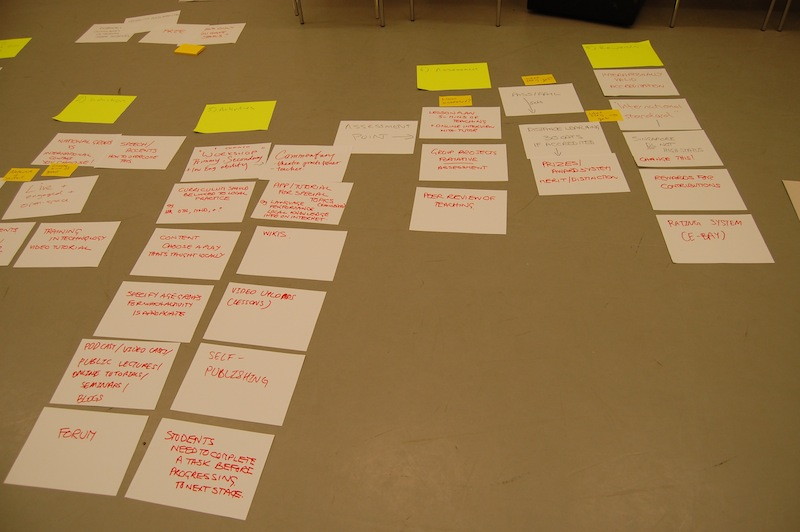
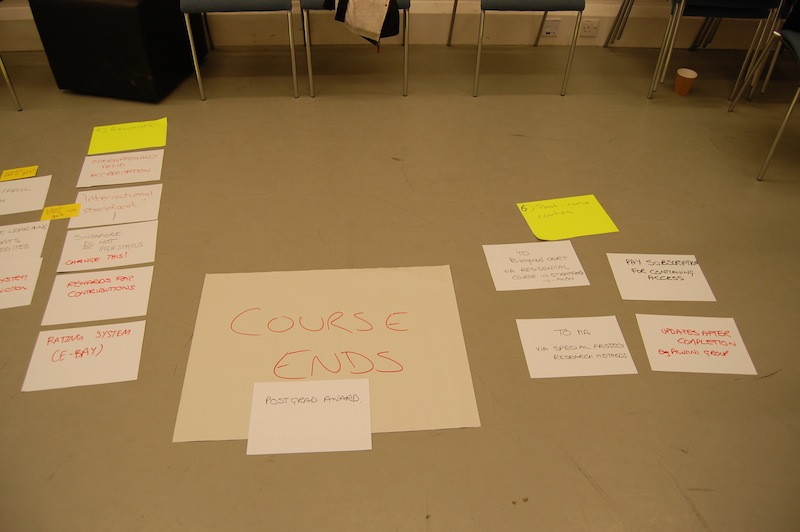
It worked! It worked just as planned! We now have an initial lo-fi prototype of the distance learning course to show to the rest of the team. The structure was perfect, with the addition of using a long whiteboard in the CAPITAL Rehearsal Room at Warwick, upon which we posted out fictional students. One half of the whiteboard contained profiles of the students before they would start the course. The other end contained statements about how they would change and what they would achieve by doing the course. We then created the prototype course timeline on the floor. This helped to make it tangible, communicable, contentious and testable. A video walkthrough was created (i'll add that when I get the all clear from the various participants). Thanks to all of the participants! Especially Jo, helped to make it fun. I have some good feedback from the students who took part. They were particularly good at working in this way. There's also much to be said about the synergy between design thinking and open-space learning.
Here's the whiteboard with our fictional students (gone a bit sepia because of the strong lighting in the room):

And a detailled image of a profile:

And some images of the timeline:
Robert O'Toole
19 Feb 2011 21:44
| ![]() Tags: Ideation
| Comments (0)
| Report a problem
Tags: Ideation
| Comments (0)
| Report a problem
February 17, 2011
Design thinking workshop to prototype a new distance learning course
Follow-up to Framework for a learning journey design workshop from Inspires Learning - Robert O'Toole
Tomorrow I will be running a three hour long design thinking workshop as part of the development process for a new distance learning course (involving Warwick and a leading international arts organisation). We will be using a "design thinking" approach, to create a lo-fi prototype of the course and the student experience. This will involve lots of theorising, sharing knowledge, values and ideas, and reflecting upon the epistemic status of facts, assumptions and conjectures. The aim is to get this part of the team to be more explicit about what they think they are creating, so as to start an iterative design and development process with a larger team. It will work like this...
Briefing
Context introduced by the lead academics.
Aims – To model potential students, to model how they will change through the course, to model how the course will change them and how they might change the course, to discover facts and assumptions, to test our models.
Outputs – Model students, ideas for activities, a timeline of events, ideas to be expanded, ideas to be tested. A physical representation of the course as a timeline will be built on the floor of the design workshop. At the beginning, model students will be created. At the end, the same students will appear, having been changed by the course. The models and timelines will be recorded as still images, and as a narrated walkthrough on camera of the timeline and student experience. After more iterations, the timeline should contain this kind of detail:

Methods - Design thinking, lo-fi prototyping, identifying facts (including concerning constraints and affordances or resources) and assumptions, creative, risk taking and questioning, iterative and agile, open-space.
Two colours of pen will be used throughout the session. A black pen indicates a fact or a definite condition. A red pen indicates an assumption, conjecture or wish.
Activity 1 – Introductions and pairings
Aiming to get good combinations of mutually supporting pairs starting from roughly the same position.
Activity 2 – Creating model students
Each pair selects a photo of a person. They must invent facts about the person to turn them into a realistic representation of a student who would do the course. They will have to “pitch” their model student to the rest of the group for evaluation as a candidate for the course. There must be sufficient and relevant detail about the students background, skills, knowledge, experience, professional role, social and personal situation, personality, motivations etc. Some attributes should be classified by being written on coloured post-it notes: cognitive attributes (pink), social attributes (orange) and emotional attributes (yellow).
Each pair will then pitch their model student to the rest of the group. The group will constructively assess the proposed student. Do they sound realistic? Would they be accepted on the course? Is the course right for them?
Activity 3 - What do we know/think already?
What are the key values, constraints and affordances (resources) available? (include dates, institutional limits, resource limits, technology limits etc) – mark them on the timeline where appropriate. The people who are less familiar with the proposed course could act as investigators, questioning the core team.
Activity 4 – How should the student have changed by the end of the course?
Remember the key values. Again the less familiar members of the group could act as investigators. Each pair should take care of their own model student and indicate on the model how they have changed by the end (constructing a second version of their person at the end of the timeline).
Activity 5 –How?
What activities can we add to the timeline to get them from the starting state to the end state? How should they be sequenced? How might the students change over time during the timeline?
Activity 6 – Testing and recording the models.
Narrating a walkthrough that describes the course and the student experience (on camera). This will be shown to other members of the wider team, and used as a starting point for further design workshops.
Robert O'Toole
17 Feb 2011 21:52
| ![]() Tags: Ideation
| Comments (0)
| Report a problem
Tags: Ideation
| Comments (0)
| Report a problem