All entries for Tuesday 20 February 2018
February 20, 2018
Using Moodle labels to signpost content
How do you add instructions, descriptions, and signposts on your Moodle page, when you need to explain something to students?
Many of our pages are currently using the 'section summaries' to deliver this content (or indeed using section summaries for all of the module's content).
In this post we'll explore why 'labels' are a more powerful and flexible way to achieve signposting in Moodle.
Wait, what's a section summary?
A section summary is the piece of content that appears directly beneath the section title. They are generally used for briefly introducing the section before the main content. Here's the official description of a section summary from the Moodle.org documentation pages:
This is a default label which allows you to place information about the specific topic or week. It could be an introduction to the unit of study or a short summary of the weekly plan. Activities and resources are listed below this section.
Because the information you add to the summary appears as a label, it should be very short so that the course page doesn't become too long. If you find yourself wanting to say more than a sentence or two then consider adding a resource to this topic instead (for example, the first activity might be a page called About This Topic).
Note the emphasis on making the section summary short! Take a look at this screenshot below which shows an example where the section summary is much longer than it needs to be:
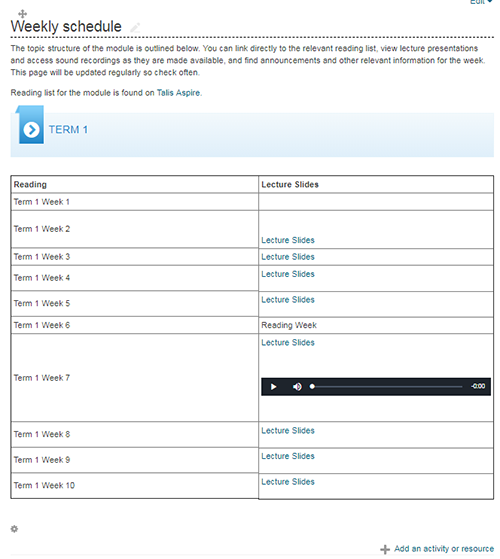
In this example, the section summary for 'Weekly schedule' contains a paragraph, a link to a Talis Aspire reading list, a subheading, a table, a list of weeks, links to lecture slides, and even an audio recording. On the face of things this works fine, but arguably it far exceeds the intended scope for a Moodle section summary.
Why are section summaries problematic?
For one thing, the whole section can only be edited in one go by clicking on the 'cog' icon at the bottom-left of the summary. As a result it can also only be moved/hidden/duplicated/exported/deleted in one go, which signficantly restricts how flexibile your module content is, for example should you ever wish to restructure your page or add new content.
Secondly, we completely lose the ability to access learning analytics for the content contained withing a section summary. We have no idea how many students are clicking on the Talis Aspire link, downloading the lecture slides, or listening to the audio recording. This is valuable information that can be used to assess and improve our modules.
Why use labels instead?
Breaking down our section into bite-sized pieces of distinct content means that our course becomes more modular/granular, and as a result we have better control over our content on a resource-by-resource basis.
Our advice would be to restrict your 'section summary' to just that - A brief 'summary' of the content that is about to follow. You can then place your content (lectures, downloads, links, video, podcasts, etc) as individual resources underneath the summary, and signpost this content using labels.
Simply put, labels are short pieces of descriptive content (usually text) that are constructed in just the same way as section summaries, except they act as standalone resources and can therefore be moved around the page or positioned in between resource to provide further clarity or explanation.
Adding a label
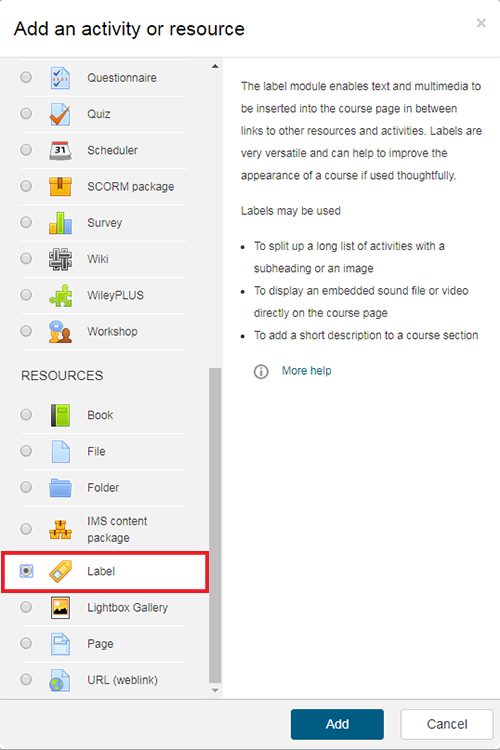
You can add a label to your page by using the 'Add an activity or resource' link and then selecting 'label' from the list of options, as shown below.
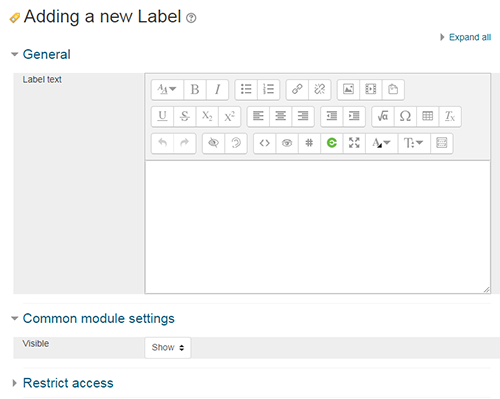
You will then be presented with a simple editing interface for inserting the content of the label. Similar to the 'section summary' editor, this contains options for headings, formatting, links, images, and media - Though in most cases we would use a label for simple text content.
We also have options here to change the 'visibility' of an individual label, or to set access restrictions (such as by student, seminar group, date, or course progress). This is a great way to make individual pieces of text or descriptive content conditional on certain prerequisites, something which is not feasible with section summaries.
An example of using labels for signposting
Below is a good example of how we might break up our content into individual resources and use labels to help signpost these resources. What is your inital impression when you see this content? Hopefully you will find the layout clear and easy to see how the week's content is broken up.
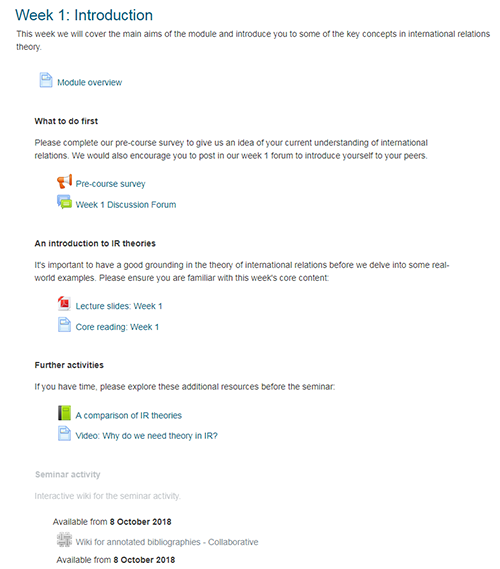
In this example, the 'section summary' is simply used for a single sentence to briefly explain what will be covered in the week. The module overview is then contained within a sub-page to reduce the amount of content shown in the section summary. After all, students probably don't need to read the module overview every time they access the course!
We then use a label ('What to do first') to point students towards some initial activities to help ease them into the module (a pre-course survey and a discussion forum), before inserting another label 'An introduction to IR theories' which sets out expectations for the week's core content.
Another label is then used to direct students to the 'optional' resources (a Moodle book and a video link), showing that labels are a great way to separate out compulsory and optional content (or provide further clarification as to the relevance of each piece of content).
We then have a greyed-out label ('Seminar activity') which is followed by a collabative wiki. Notice how these have both been set to release from 8th October, which shows how we can use conditional access settings to control visibility of content (including labels) based on factors like date, student ID, or seminar grouping.
And the best thing from the point of view of the teacher, is that all these resources and labels can be individually moved, edited, and hidden, because they have been added as individual pieces of content rather than as one whole section summary. It's now also incredibly simple to insert additional resources at any point in the course.
We can also access learning analytics for all the individual resources in this section, enabling us to measure the students' engagement with the core material, optional resources, collaborative wiki, etc. This gives us a valuable insight into the ways students are interacting with our content.
This is just one example of how labels might be used to provide better signposting, structuring, and clarification on your module page. There are many more use cases out there - the possibilities really are endless.
Any questions?
I hope this post will help you see the potential benefits of using labels for structuring your Moodle page.
If you have any queries or would like further support on your module page, please feel free to contact me.
 James Roscoe
20 Feb 2018 12:49
|
James Roscoe
20 Feb 2018 12:49
| ![]() Tags: Label Moodle Sections Signposting
|
Tags: Label Moodle Sections Signposting
|  Comments (0)
|
Comments (0)
|  Report a problem
 Please wait - comments are loading
 Loading…