All entries for February 2018
February 20, 2018
Using Moodle labels to signpost content
How do you add instructions, descriptions, and signposts on your Moodle page, when you need to explain something to students?
Many of our pages are currently using the 'section summaries' to deliver this content (or indeed using section summaries for all of the module's content).
In this post we'll explore why 'labels' are a more powerful and flexible way to achieve signposting in Moodle.
Wait, what's a section summary?
A section summary is the piece of content that appears directly beneath the section title. They are generally used for briefly introducing the section before the main content. Here's the official description of a section summary from the Moodle.org documentation pages:
This is a default label which allows you to place information about the specific topic or week. It could be an introduction to the unit of study or a short summary of the weekly plan. Activities and resources are listed below this section.
Because the information you add to the summary appears as a label, it should be very short so that the course page doesn't become too long. If you find yourself wanting to say more than a sentence or two then consider adding a resource to this topic instead (for example, the first activity might be a page called About This Topic).
Note the emphasis on making the section summary short! Take a look at this screenshot below which shows an example where the section summary is much longer than it needs to be:
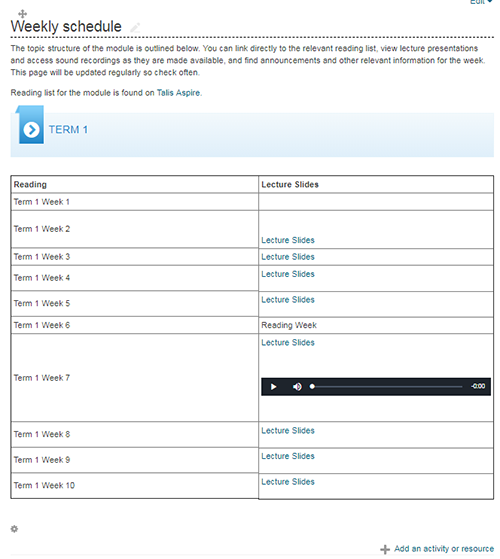
In this example, the section summary for 'Weekly schedule' contains a paragraph, a link to a Talis Aspire reading list, a subheading, a table, a list of weeks, links to lecture slides, and even an audio recording. On the face of things this works fine, but arguably it far exceeds the intended scope for a Moodle section summary.
Why are section summaries problematic?
For one thing, the whole section can only be edited in one go by clicking on the 'cog' icon at the bottom-left of the summary. As a result it can also only be moved/hidden/duplicated/exported/deleted in one go, which signficantly restricts how flexibile your module content is, for example should you ever wish to restructure your page or add new content.
Secondly, we completely lose the ability to access learning analytics for the content contained withing a section summary. We have no idea how many students are clicking on the Talis Aspire link, downloading the lecture slides, or listening to the audio recording. This is valuable information that can be used to assess and improve our modules.
Why use labels instead?
Breaking down our section into bite-sized pieces of distinct content means that our course becomes more modular/granular, and as a result we have better control over our content on a resource-by-resource basis.
Our advice would be to restrict your 'section summary' to just that - A brief 'summary' of the content that is about to follow. You can then place your content (lectures, downloads, links, video, podcasts, etc) as individual resources underneath the summary, and signpost this content using labels.
Simply put, labels are short pieces of descriptive content (usually text) that are constructed in just the same way as section summaries, except they act as standalone resources and can therefore be moved around the page or positioned in between resource to provide further clarity or explanation.
Adding a label
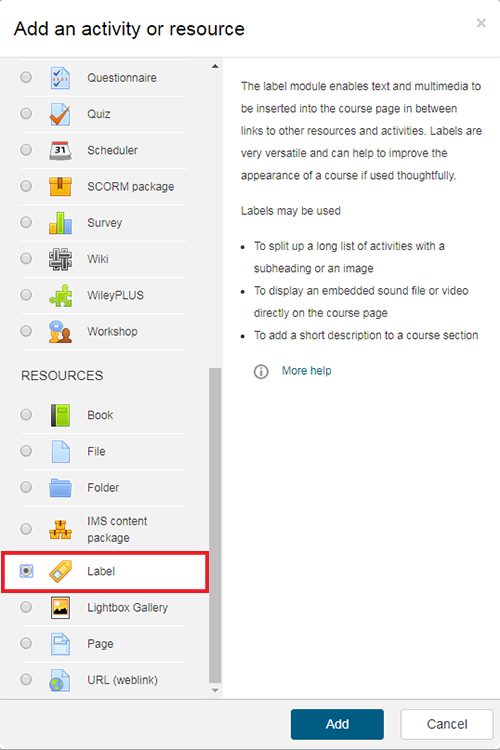
You can add a label to your page by using the 'Add an activity or resource' link and then selecting 'label' from the list of options, as shown below.
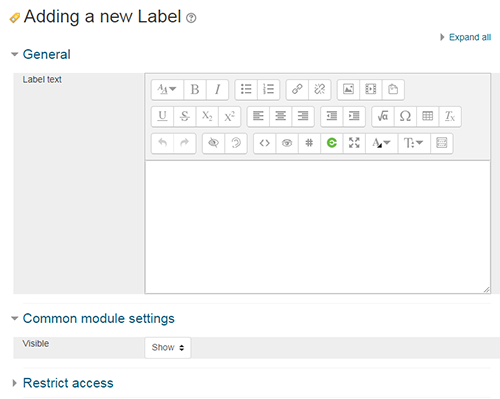
You will then be presented with a simple editing interface for inserting the content of the label. Similar to the 'section summary' editor, this contains options for headings, formatting, links, images, and media - Though in most cases we would use a label for simple text content.
We also have options here to change the 'visibility' of an individual label, or to set access restrictions (such as by student, seminar group, date, or course progress). This is a great way to make individual pieces of text or descriptive content conditional on certain prerequisites, something which is not feasible with section summaries.
An example of using labels for signposting
Below is a good example of how we might break up our content into individual resources and use labels to help signpost these resources. What is your inital impression when you see this content? Hopefully you will find the layout clear and easy to see how the week's content is broken up.
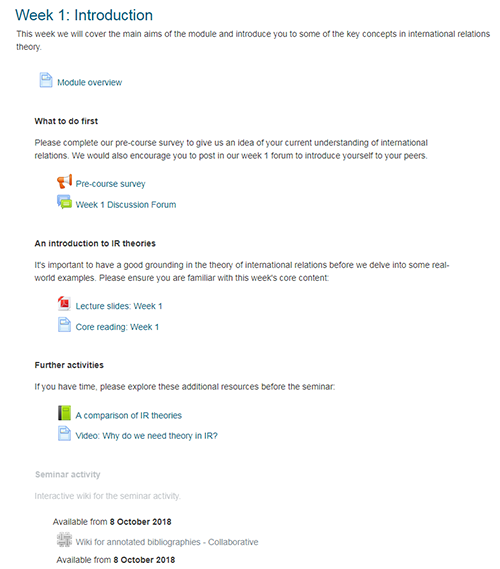
In this example, the 'section summary' is simply used for a single sentence to briefly explain what will be covered in the week. The module overview is then contained within a sub-page to reduce the amount of content shown in the section summary. After all, students probably don't need to read the module overview every time they access the course!
We then use a label ('What to do first') to point students towards some initial activities to help ease them into the module (a pre-course survey and a discussion forum), before inserting another label 'An introduction to IR theories' which sets out expectations for the week's core content.
Another label is then used to direct students to the 'optional' resources (a Moodle book and a video link), showing that labels are a great way to separate out compulsory and optional content (or provide further clarification as to the relevance of each piece of content).
We then have a greyed-out label ('Seminar activity') which is followed by a collabative wiki. Notice how these have both been set to release from 8th October, which shows how we can use conditional access settings to control visibility of content (including labels) based on factors like date, student ID, or seminar grouping.
And the best thing from the point of view of the teacher, is that all these resources and labels can be individually moved, edited, and hidden, because they have been added as individual pieces of content rather than as one whole section summary. It's now also incredibly simple to insert additional resources at any point in the course.
We can also access learning analytics for all the individual resources in this section, enabling us to measure the students' engagement with the core material, optional resources, collaborative wiki, etc. This gives us a valuable insight into the ways students are interacting with our content.
This is just one example of how labels might be used to provide better signposting, structuring, and clarification on your module page. There are many more use cases out there - the possibilities really are endless.
Any questions?
I hope this post will help you see the potential benefits of using labels for structuring your Moodle page.
If you have any queries or would like further support on your module page, please feel free to contact me.
 James Roscoe
20 Feb 2018 12:49
|
James Roscoe
20 Feb 2018 12:49
| ![]() Tags: Label Moodle Sections Signposting
|
Tags: Label Moodle Sections Signposting
|  Comments (0)
|
Comments (0)
|  Report a problem
 Please wait - comments are loading
February 14, 2018
Adding RSS feeds in Moodle
As it's currently reading week at Warwick, why not use this opportunity to add some useful reading links to your Moodle page via the power of RSS feeds!
What is an RSS feed?
RSS feeds are a great way to provide your students with links to the latest content from external blogs, news, and other websites that may be of relevance to your module. It provides a constantly up-to-date list of the latest posts and articles from a chosen source, and is a really nice way to keep your page current and relevant without having to manually add new content.
So what does 'RSS' stand for? Well, there's actually some debate about that, but most people believe it stands for 'Really Simple Syndication'. Let's have a look at just how simple it is to set up...
Finding an RSS feed
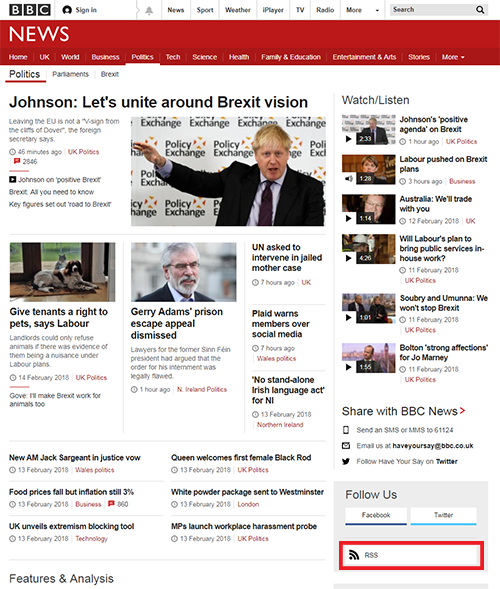
First, establish the website that you want to draw content from. You'll then need to check that the site has its own RSS feed, so look out for a link or button with words 'RSS' and/or 'Feed', and in particular keep an eye out for the RSS icon, often shown in orange as below.
![]()
For this example, I'm going to use the BBC's Politics news feed and show how this can be embedded into Moodle. In this screenshot below, taken from the BBC Politics landing page, you can see the RSS feed icon that I've highlighted in the bottom-right. This one is quite small and not actually shown in orange (which demonstrates they can be a little tricky to spot at first), but nevertheless the feed is there.
On clicking that link you will usually be presented with the raw output of the latest posts, but it's not what we see on this page that's important but rather the link to the feed itself.
You'll need to copy the link to the RSS feed, either by right-clicking the link and choosing 'Copy link address' (or similar, depending on your browser), OR you can click on the link and then lift the URL from your browser's address bar, as pictured below. In this case, the URL is 'http://feeds.bbci.co.uk/news/politics/rss.xml', so this is what we need to copy to our clipboard.

Adding the RSS feed block
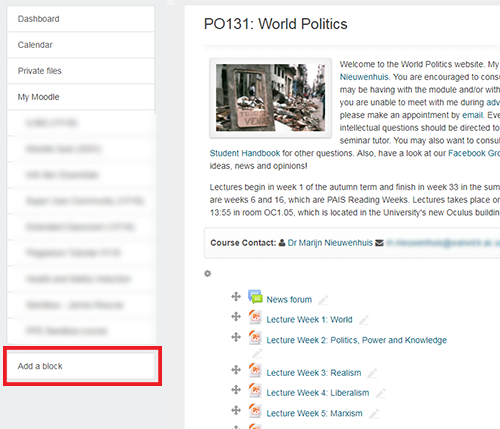
Firstly, you will need to 'Turn editing on' for the page via the cog in the far top-right of the module page. This will allow you to add content.
Next, at the bottom of the left-hand navigation menu, choose 'Add a block', as highlighted in red below. If you can't see the left-hand navigation menu, you may need to toggle it on by clicking the menu icon in the top-left of Moodle (also highlighted below).

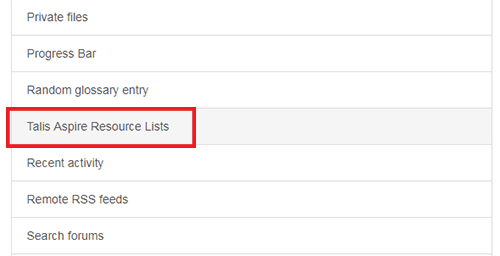
You will then be presented with a list of possible blocks to add to your page. In this list, select 'Remote RSS feeds', as highlighted below.

You will now see the (empty) 'Remote RSS feed' block appearing in the right-hand column of your module page, which you can now move, show/hide, or configure. It's the 'configure' option (via the cog drop-down) that we need to use to set up our feed.

Configuring an RSS feed
On the configure screen, you will see a number of options. You will also notice that there is a list shown of existing feeds that other colleagues have already added and made 'public' (feel free to make use of these if they look useful!).
To add your own feed (in this case the BBC Politics feed that we grabbed earlier) we need to click on the 'Add/edit feeds' link'.

Depending on your level of permissions, the next screen might show you some pre-existing feeds, or it might not. Either way, click on the 'Add a new feed' button at the bottom.
This will then take you to the next screen for adding a new feed, as shown below.

You will need to paste in the RSS link that you copied earlier into the top box (Feed URL), and then you can choose to give it a custom title if you wish.
Naming it is optional, as the feed should generate its own title. In the case of this feed, the BBC actually provides an automatic title of 'BBC News - UK Politics', which is probably good enough. But, for some feeds you may wish to provide your own title for clarification, or perhaps just to shorten it. In the example above, I've decided to rename it 'BBC Politics'.
You also have the option to set it as a 'Shared feed'. This means that other colleagues at the University will be able to see it in the main list of existing feeds, but depending on their permissions they may be able to edit/delete it too! For this reason, I'd advise keeping this set to 'No', unless you have a good reason to do otherwise.
Click 'Add a new feed', which saves the feed and takes you back to the 'Manage all my feeds' page.
You now need to go back to the module landing page - the quickest way to do this is to click your module title in the 'breadcrumb trail' of links along the top. Then (as before) use the cog drop-down on the RSS side block and re-enter the configuration settings. You will then see your feed listed in the 'Choose the feeds...' list, which you can now select!

There are a few other options available on this screen which I will briefly explain:
- Display each link's description - If the RSS feed supports it, you will get a brief description underneath the title/link to each resource.
- Max number of entries to show per block - Pretty much what it says, but perhaps this should best be thought of as 'Max number of entries to show per feed' (see next point).
- Choose the feeds... - As discussed, select your feed here. You can even select multiple feeds (by shift+clicking or ctrl+clicking), and then each feed will display the number of posts selected above - So in theory selecting 2 feeds with a max number of 5 would result in 10 posts in total on your block.
- Title- If you want to rename the title of the block. If you leave this blank, you will get the title of the feed itself as the name of the block, which may be fine. I would definitely recommend inserting your own title if you are selecting multiple feeds, otherwise the block title will lift it from the first feed (which is a tad confusing).
- Show a link to the original site - You will get a link saying 'Source site...' at the bottom of the block which will take you to the website of the feed provider (can be useful if you want to encourage students to read more articles, but note that this only works for the first feed if you select multiple feeds.
- Show channel image if available - You may get an image/logo from the publisher at the top of the block, but not the words 'if available'... Some publishers don't provide them!
Due to the discrepancies discussed above in relation to 'number of entries' and 'title', I would tend to recommend only selecting one feed per block. Using multiple feeds per block can create some confusion, and you will be probably find the interface is cleaner and easier to manage if you simply add another block to your Moodle page and insert the second feed that way (if you actually want multiple feeds).
Hit 'Save changes' and you can then return to your module landing page and see the newly added feed on the right-hand side, as shown below (which may vary in appearance depending on the options you selected above).

And that's all you need to do! It may take you a few minutes to add/configure the feed, but once done you won't have to touch it again and you can benefit from a continuously updating list of news stories that will publish as links to your page whenever the publisher adds new content.
It's a great way to help make your module page feel fresh, current, and up-to-date, and also gives students more variety in terms of the range of sources that you direct them to read. We're already seeing some great uses of RSS feeds around the departments of PAIS, Philosophy, and Sociology at Warwick, so next time you're reading a relevant blog or website, do look out for the 'RSS Feed' icon and consider adding it to your Moodle page!
Any questions?
I hope this post will help you with adding RSS feeds to your Moodle page, and is something you may consider providing for students during reading week.
You can also find further support documentation over on moodle.org - Remote RSS feeds block.
If you have any queries or would like further support on your module page, please feel free to contact me.
James Roscoe
14 Feb 2018 15:57
| ![]() Tags: Feed Moodle RSS
| Comments (0)
| Report a problem
Tags: Feed Moodle RSS
| Comments (0)
| Report a problem
February 07, 2018
Talis Aspire blocks in Moodle
Staff and students at Warwick can take advantage of the Talis Aspire reading lists to help organise and manage reading lists.
There are many advantages of using Aspire lists (compared to static reading lists), including better controls for integration with the library, the ability to link directly to resources, better sharing capabilities, features for tracking engagement, as well as ensuring a consistent approach across multiple modules.
It's also possible to automatically add a link in your Moodle module to the current year's reading list. In this post, we'll look at how to add and configure this feature on your Moodle page.
Adding the Talis Aspire side block
Firstly, you will need to 'Turn editing on' for the page via the cog in the far top-right of the module page. This will allow you to add content.
Next, at the bottom of the left-hand navigation menu, choose 'Add a block', as highlighted in red below. If you can't see the left-hand navigation menu, you may need to toggle it on by clicking the hamburger-style menu icon in the top-left of Moodle.
You will then be presented with a list of possible blocks to add to your page. In this list, select 'Talis Aspire Resource Lists', as highlighted below.
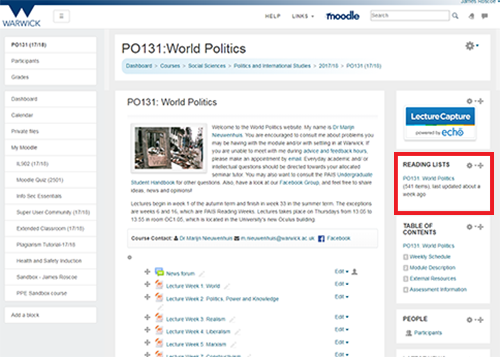
The block will then be visible on your page (as shown below), and providing the current year's list has been correctly linked to your module within Talis then it should automatically display a link to the list, along with the number of entries it contains and the date it was last modified. It really is as easy as that!
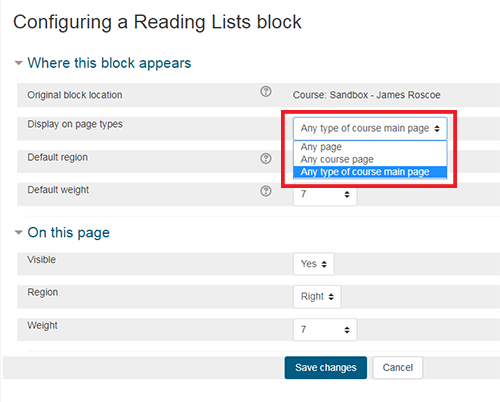
Configuring the block
There are a few options available to you once the block has been added. You will need to ensure you clicked 'Turn editing on' for the module in order to see these options (This will already be the case if you have just added it via the instructions above!).
You can move the position of the block within the sidebar by dragging-and-dropping the 'arrows' icon shown below. You can also show/hide the block via the cog dropdown, and you can also use this dropdown to gain access to the 'Configure' settings for the block.
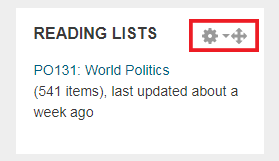
Within the 'configure' settings, there are a few different options - But the one I would draw your attention to is the 'Display on page types' dropdown. This gives you three options to choose from, which determines where the block will be visible for students:
- Any page
- Any course page
- Any type of course main page
The difference between these options may be a tad confusing at first, as they rely on a complicated combination of page types, page contexts, sub-pages, and permissions. There's a more detailed discussion around this over on the Moodle.org forums, but as a general rule of thumb: For Warwick's Moodle site, you should choose 'Any type of course main page' if you just want the block to appear on the module's landing page, or alternatively choose 'Any page' if you want it to appear both on the landing page AND any sub-pages.
These visibility options also apply to other Moodle blocks (such as the Echo 360 block) so it's worth knowing they are there. If in doubt, I'd stick with the default (usually 'Any type of course main page') as this is what most modules will be using.
Any questions?
I hope this post will help you with setting up your Talis Aspire reading block on your Moodle module page.
If you have any queries or would like further support on your module page, please feel free to contact me.
James Roscoe
07 Feb 2018 14:53
| Comments (0)
| Report a problem
 Loading…